Designed to give the experience of using a real Enigma machine, as far as possible within the limitations of a flat screen. On smaller devices like phones, the layout is "scrunched up" to make best use of the space available; on bigger devices such as tablets, the spacing between the keys and indicators is more realistic.
Extracts from the User Guide:
Turning the rotors
To change which letter is showing, push/drag the serrated wheel at the right of each letter up or down to rotate the ring and the scrambling wiring inside it.
Pressing the keys
Pressing and holding a key does three things:
1. The right-hand rotor moves round by one step. In certain positions some of the other rotors may also move.
2. In the middle part of the machine one of the lamps marked with a letter lights up. This shows the enciphered result of the letter you pressed.
3. The enciphered letter is also printed on a paper tape, shown just above the lamps. Only a few real Enigma machines had a printer, but we have included it so you can use it for some cool things in the simulator.
Encrypting your first message
Turn each of the rotors so that a particular set of letters that you choose is showing. These letters are your message key; you should remember them or write them down so you will be able to decrypt your message.
If you already have some letters printed on the paper tape, click on the tape and then select "Clear" to tear it off and start again.
Type a short message using the keys in the lower part of the machine. For real machines without a printer there would usually have been two operators, one to press and hold the keys and the other to write down which letters lit up, but you don't need to do that.
Your encrypted message is now printed on the paper tape.
Decrypting your first message
First, turn the rotors back so your original message key letters are showing in the windows. The process for decrypting a message is identical to encrypting; in cryptography terms the mechanism is reciprocal.
Now you have a choice: you can read the encrypted message letters back off the paper tape and press the keys one by one, as a real Enigma machine operator would have done, or you can take a shortcut:
* Click on the tape and select "Copy" to have the simulator remember the printed message.
* Click on the tape and select "Clear" (if you like, this is not essential).
* Click on the tape and select "Paste" to have the simulator type the encrypted message in for you.
You should see the message that you typed originally now printed on the paper tape. Success!
Changing Simulator Options
You can change some of the ways in which the simulator works. Press the "ENIGMA" logo in the upper right part of the machine to get a command menu (also available via the menu button) and select "Options".
Machine Settings
If you want your encrypted message to be decrypted on another machine, both machines must have the same internal configuration settings. To set up the internal configuration of your virtual Enigma machine, choose "Settings" from the command menu.
Saving and loading
There are a several save files pre-installed containing the settings and message keys for various real Enigma messages. You can delete these if you don't want them.
The "About" screen
When first installed, the simulator will show adverts on the screen alongside your machine. The "About" selection from the command menu takes you to a screen with a button you can press to make a small payment to remove the advert displays; this payment includes a donation to the Bletchley Park Trust, dedicated to preserving the site where codebreakers including Alan Turing worked to crack the Enigma codes in World War II.
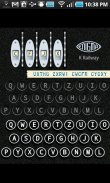
실제 수수께끼 기계를 사용하여, 최대한 평면의 한계 내에서의 경험을 제공하도록 설계되었습니다. 전화와 같은 작은 장치에서, 레이아웃은 사용 가능한 공간을 최대한 활용하기 위해 "최대 이긍"되고 정제와 같은 큰 장치에서 키와 지표 사이의 간격은 현실적이다.
사용자 설명서에서 추출
로터 회전
표시되는 문자를 변경하려면 푸시 / 반지와 내부의 다툼 배선을 회전하도록 각 문자의 오른쪽 또는 아래 톱니 바퀴를 드래그합니다.
키를 누르면
누르면 키를 누른 다음 세 가지 작업을 수행합니다 :
1. 오른쪽 회전 한 단계에서 라운드 이동합니다. 특정 위치에 다른 회 전자의 일부는 이동할 수 있습니다.
2. 문자 점등으로 표시 램프의 기계 하나의 중간 부분. 이것은 당신이 누른 문자의 enciphered의 결과를 보여줍니다.
3. cipher 화 문자는 단지 램프 위와 같이 종이 테이프에 인쇄되어 있습니다. 몇 실제 수수께끼 기계 프린터를 가지고,하지만 당신은 시뮬레이터의 멋진 명소를 사용할 수 있도록 우리는 그것을 포함되어있다.
첫 번째 메시지를 암호화
당신이 선택하는 문자의 특정 집합이 표시되도록 로터의 각을 설정합니다. 이 문자 메시지의 핵심입니다, 그래서 당신은 해독 메시지 수있을 것입니다 당신이 그들을 기억하거나 적어해야합니다.
이미 종이 테이프에 인쇄 된 일부 문자가있는 경우, 테이프를 클릭 한 다음 전원을 껐다가 찢어 "삭제"를 선택하고 다시 시작합니다.
기계의 하부에 키를 사용하여 간단한 메시지를 입력합니다. 프린터없이 실제 시스템에 대해이 일반적으로 키와 키와 문자가 점등되는 적어 다른 보유하는 두 개의 연산자 하나 이겠지만, 당신은 그것을 할 필요가 없습니다.
암호화 된 메시지는 이제 종이 테이프에 인쇄되어 있습니다.
첫 번째 메시지의 암호를 해독
원래 메시지 키 문자 창에 표시되도록 먼저, 다시 회를 켭니다. 메시지를 암호 해독 과정은 암호화와 동일합니다, 암호화 측면에서 메커니즘은 상호입니다.
당신은 종이 테이프 떨어져 다시 암호화 된 메시지의 편지를 읽고 실제 수수께끼 기계 운영자가했던 것처럼, 하나 키 하나를 누를 수, 또는 당신은 바로 가기를 수행 할 수 있습니다 지금은 선택의 여지가 :
* 테이프를 클릭하고 시뮬레이터가 인쇄 된 메시지를 기억하고있다 "복사"를 선택합니다.
* 테이프에 클릭하고 (당신이 좋아하는 경우에, 이것은 필수가 아닙니다) "지우기"를 선택합니다.
* 테이프를 클릭하고 시뮬레이터가 당신을 위해있는 암호화 된 메시지를 입력하도록 "붙여 넣기"를 선택합니다.
당신은 원래 지금 종이 테이프에 인쇄 입력 한 메시지를 볼 수 있습니다. 성공!
시뮬레이터 옵션 변경
당신은 시뮬레이터가 작동하는 방식을 변경할 수 있습니다. 명령 메뉴를 (또한 메뉴 버튼을 통해 사용 가능) 얻을 "옵션"을 선택합니다 기계의 오른쪽 상단에있는 "수수께끼"로고를 누르십시오.
시스템 설정
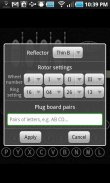
당신이 암호화 된 메시지를 다른 컴퓨터에서 암호를 해독 할하려는 경우, 두 컴퓨터는 동일한 내부 구성 설정을해야합니다. 가상 수수께끼 기계의 내부 구성을 설정하려면 명령 메뉴에서 "설정"을 선택합니다.
저장 및로드
여러 개의 저장 파일을 다양한 실제 수수께끼 메시지 설정 및 메시지 키를 포함한 사전 설치되어 있습니다. 당신이 그들을 원하지 않는 경우에는이를 삭제할 수 있습니다.
"정보"화면
처음 설치되면, 시뮬레이터는 컴퓨터와 함께 화면에 광고가 표시됩니다. 명령 메뉴에서 "정보"선택은 광고 표시를 제거하는 작은 지불을 위해 누를 수있는 버튼이있는 화면으로 이동합니다;이 지불 블레 츨리 파크 트러스트에 기부를 포함, codebreakers을 포함한 사이트를 유지에 전념 앨런 튜링은 세계 대전에서 수수께끼의 코드를 해독했다.